Using Pandoc to Make Beautiful LaTeX Presentations
We at Data In Motion Consulting GmbH are currently working at the preparation of a course, so we came across to the need of making some presentations.
I, personally, as coming from an academic environment, was used to prepare my slides using LaTeX. Its beamer package, in particular, is quite famous for making presentations, as it comes with a lot of different and elegant styles.
The only problem I had with LaTeX is that sometimes the syntax can be quite hard to master, and you could end up spending a lot of time rendering things exactly how you wanted to.
In these two years as a software developer, I became quite familiar with Markdown, instead, which has, on the contrary, a pretty straightforward syntax and allows you to easily document your code and prepare notes. I am quite found of Typora as Markdown editor, as it is very intuitive to use, and provides a lot of cool functionalities.
Among them, one over all grabbed my attention: the possibility to directly convert Markdown into LaTeX!
So I started experimenting a bit, and I wanted to share with you what I found out, in the hope that it could be useful to someone else as well.
First of all, to be able to use some of the Typora exports functionalities, including the LaTeX one, you need Pandoc. This is the tool which does the actual conversion work under the hood. It allows you to convert a wide variety of formats into other ones.
Once you have Pandoc installed, you can simply write your markdown document in Typora, and then export it in LaTeX.
This will result in a .tex file, that you can easily convert to a PDF with tools like pdflatex. However, this does not produce a slide-like document, but rather a standard LaTeX one.
What I needed, instead, was to be able to convert my markdown document into a .tex file yes, but a .tex file which made use of the beamer package. I went a bit through the Pandoc documentation and I found out that there is actually the possibility to convert markdown to beamer. The only thing that you need to do is to specify the target format when invoking Pandoc from the command line.
pandoc --to=beamer --output=out.pdf test.md
And that’s it! This takes your markdown input file (test.md), convert it to LaTeX beamer, and produces a PDF output file (out.pdf).
If you want to have more control over the output, Pandoc also offers the possibility to produce the intermediate .tex file first, so you can add customizations of your choice before actually convert it to a PDF. Just use, instead:
pandoc --to=beamer --standalone --output=out.tex test.md
OK, now we know how to made the conversion, but what about how to prepare our Markdown file in such a way that the slide structure is properly interpreted?
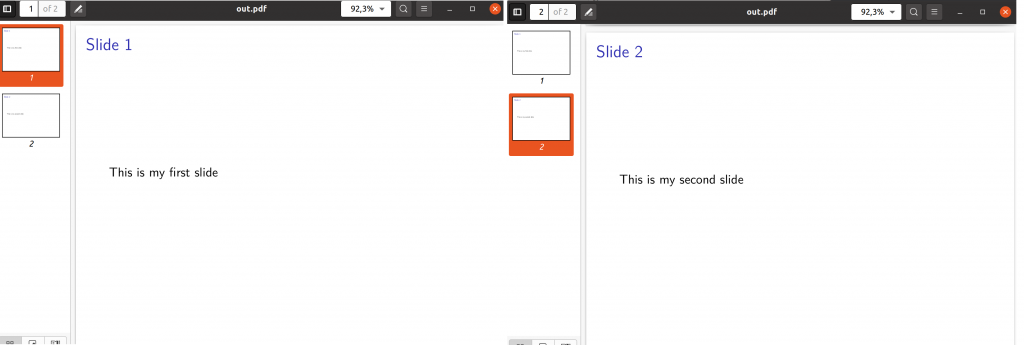
Well, Pandoc interpret each Markdown headline as a new slide. So, typing
# Slide 1
This is my first slide

# Slide 2
This is my second slide
will produce, once converted to PDF, something like
Now, as I said before, the LaTeX beamer package comes with a lot of nice styles to customize your presentation. So, we can start to add one of them, to make it a bit nicer. In your Markdown document, insert some YAML meta data. If you are using Typora, you can go to Paragraph -> YAML Front Matter. This should insert a dedicated space on top of your document, in which you can insert some meta information.
---
author: Ilenia Salvadori
title: My Awesome Presentation!
institute: Data In Motion Consulting GmbH
theme: Berlin
---

# Slide 1
This is my first slide
So, here I have inserted a bunch of info, such as the author name, the title of the presentation, and my affiliation. Plus, I have added the name of the beamer theme I want to use (in my case Berlin). Let’s execute the conversion using Pandoc, and what you should get is something like this.
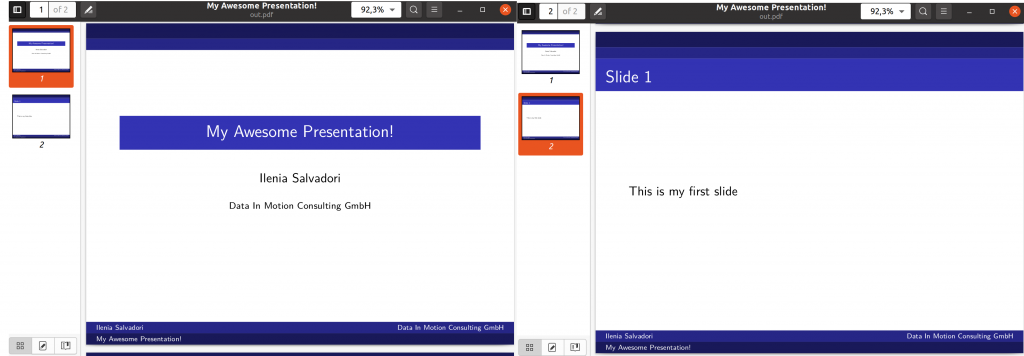
As you can see a title slide has been generated with all the meta information I have inserted and with the typical layout given by the beamer Berlin theme!
Of course, as soon as you start adding content to your presentation, you will probably realize that you need some more freedom in customizing the final result. What you could do is to prepare a separate .tex file, in which you specify all your customizations, and then you can include this file when converting the Markdown document.
I have prepared a mystyle.tex file, in which I have put all my beamer-specific directives, such as
\setbeamertemplate{page in head/foot}[framenumber]
\setbeamertemplate{page number in head/foot}[framenumber]
\logo{\includegraphics[height=0.8cm]{../Logo_DIMC.png}\vspace{220pt}}
\definecolor{capri}{rgb}{0.1, 0.7, 1.0}
\usecolortheme[named=capri]{structure}
If you are not familiar with the LaTeX syntax do not worry. Just google what you want to achieve and, as always, there would be someone else who tried that first and found a working solution!
In my example here, I am not doing anything too fancy. I am just setting the slide number to be shown in the presentation, together with a logo image to be displayed in the title slide, and I am changing the shadow of blue for the theme. To compile Pandoc using a custom .tex file, just type:
pandoc --to=beamer --include-in-header=./mystyle.tex --standalone --output=out.tex test.md
Executing this command with our previous example should produce something like

And that’s it! The simplicity of Markdown syntax together with the elegance of a LaTeX presentation! Awesome!
If you do not want to install Pandoc and LaTeX, you could simply use a Docker container for that. Check this one out! There are instructions for two Docker images, one containing just the core Pandoc functionalities and another one including LaTeX. To execute the document conversion using Docker, just prepare a .sh file in which you specify the Pandoc command:
#!/bin/sh
pandoc --to=beamer --include-in-header=./mystyle.tex --standalone --output=out.tex test.md
pdflatex out.tex
and then, from your command line, just execute (all in the same command):
docker run --rm --volume "'pwd':/data"
    --entrypoint "/data/script.sh" pandoc/latex:2.6
The first time this will also download the image, so it will take longer. For those of you who are not familiar with Docker, this command run the Docker image pandoc/latex:2.6, mapping a folder called /data inside the container to our current folder. So, basically the container has in its /data folder what we have in our current location. And it executes the script.sh, which is the one in which we specified the Pandoc command.
I hope you appreciate that as much as I do, and that you found this post helpful! There are plenty of things you can set on yourself to customize even more your presentation, so I invite you to have a look at both the beamer and the Pandoc documentation, and start making some beautiful presentations in an easy way!!
by Ilenia Salvadori